Configuring Microsoft Dynamics 365 Business Central version 19.5 involves several steps to set up the system for your organization's specific requirements. Here's a step-by-step guide to help you through the process:
System Requirements Check:
Ensure that your server hardware and software meet the minimum requirements specified by Microsoft for Business Central version 19.5. This includes considerations for CPU, RAM, disk space, operating system version, and other dependencies.
Install Prerequisites:
Install any prerequisite software such as the appropriate version of Windows Server, SQL Server, and other required components like .NET Framework, Internet Information Services (IIS), etc.
Download Business Central Installation Files:
Obtain the installation files for Microsoft Dynamics 365 Business Central version 19.5 from the Microsoft website or your Microsoft partner.
Install Business Central Server:
Run the setup program on the server where you want to install Business Central Server.
Follow the on-screen instructions to install the Business Central Server components. Specify the installation folder, service account, and authentication method.
Configure Business Central Server:
After installation, configure the Business Central Server instance by running the Configuration Wizard.
Specify settings such as the ServerInstance name, Web Server Instance name, authentication method (Windows or NavUserPassword), and other options as per your requirements.
Configure additional settings related to HTTPS, certificates, and server communication if you're using secure connections.
Set Up Web Server Components:
Configure Internet Information Services (IIS) to host the Business Central Web Client and other web-based components.
Create and configure websites and application pools in IIS for Business Central.
Database Setup:
Install and configure Microsoft SQL Server with the necessary databases for Business Central. This includes creating databases for the application data, metadata, and transaction log files.
Install Business Central Client:
Install the Business Central Client on user workstations or devices as needed.
You can also access Business Central through a web browser without installing the client application.
Initial Configuration Setup:
Log in to Business Central using the provided credentials.
Perform initial configuration tasks such as setting up the company information, chart of accounts, general ledger accounts, and default settings for sales, purchases, and inventory.
User Setup and Security:
Create user accounts for individuals who will access Business Central.
Define security roles and permissions to control access to data and functionality within Business Central.
Testing and Validation:
Perform thorough testing to ensure that Business Central is functioning correctly.
Test various scenarios such as user authentication, data access, web client performance, and integration functionalities.
Backup and Disaster Recovery Setup:
Implement a backup and disaster recovery plan for Business Central server components and databases. Configure regular backups and test the restoration process to ensure data integrity.
Documentation and Training:
Document the configuration settings, customizations, and any specific setup details for your Business Central deployment.
Provide training and support to users who will be using Business Central for their daily tasks.
By following these steps, you can successfully configure Microsoft Dynamics 365 Business Central version 19.5 for your organization's needs. Remember to refer to the official Microsoft documentation and best practices guides for detailed instructions and recommendations throughout the configuration process.
Virtual Private Network Configurations
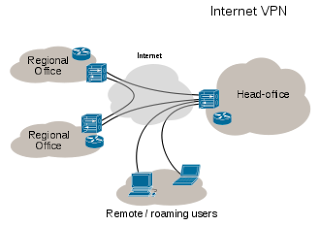
A virtual private network ( VPN ) extends a private network across a public network, such as the Internet . It enables users to send and receive data across shared or public networks as if their computing devices were directly connected to the private network, and thus are benefiting from the functionality, security and management policies of the private network. Server Settings For Vpn (Virtual Private Network) Step1:First You have to access Your Router from gateway address. Step2: Then Goto Forwarding Menu . Step3:Then Go to Virtual Server Server Port:1723 Give The Ip address of Server of vpn.Than Click Save. Step4: Goto Reboot. Step5:Give The ip address of your network range. Step6: Then Go to network and sharing center and than click onto change adapet setting and than press ALT+F Select New Incoming Connection. Step7:Than Configure the User Information. Step8:The...

Comments
Post a Comment