Posts

Recall Email in Outlook.

Try it! If you and your recipients are all on Microsoft Exchange or Microsoft 365 and in the same organization, you can recall or replace an email message that you sent. Important: If your account is a MAPI or POP account, recall won't work. Select the Sent Items folder. Select or double-click the message so it opens in another window. Select File > Info. Select Message Resend and Recall > Recall This Message..., and select one of the two options. Select Delete unread copies of this message to recall the sent message. Select Delete unread copies and replace with a new message to replace the sent message with a new message. Select the Tell me if recall succeeds or fails for each recipient check box. Select OK. Note: If you selected Delete unread copies and replace with a new message, the original message opens for editing. When you select Send, the original email message will be deleted from the recipient’s mailbox and replaced with the newly edited one. Want more?
Configuring Microsoft Dynamics 365 Business Central version 19.5 involves several steps to set up the system for your organization's specific requirements. Here's a step-by-step guide to help you through the process: System Requirements Check: Ensure that your server hardware and software meet the minimum requirements specified by Microsoft for Business Central version 19.5. This includes considerations for CPU, RAM, disk space, operating system version, and other dependencies. Install Prerequisites: Install any prerequisite software such as the appropriate version of Windows Server, SQL Server, and other required components like .NET Framework, Internet Information Services (IIS), etc. Download Business Central Installation Files: Obtain the installation files for Microsoft Dynamics 365 Business Central version 19.5 from the Microsoft website or your Microsoft partner. Install Business Central Server: Run the setup program on the server where you want to install Business
Microsoft Dynamics BC 19.5 With In Version Install with the demo version after that upgrade SQL server version than please restore the database with the latest one. Clear DB Permissions MicrosoftDynamicsNavServer$BC190 USE [Database Name] GO delete from [dbo].[User] delete from [dbo].[Access Control] delete from [dbo].[User Property] delete from [dbo].[Page Data Personalization] delete from [dbo].[User Default Style Sheet] delete from [dbo].[User Metadata] delete from [dbo].[User Personalization] GO to business central shell run as administrator Than Set-NAVServerPermission for users and Update services for the account and sql + BC 19.5 versions

Amazon

Image
Best Sale

Virtual Private Network Configurations

Image
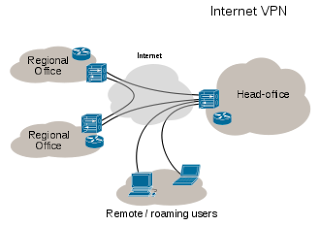
A  virtual private network  ( VPN ) extends a  private network  across a  public  network, such as the  Internet . It enables users to send and receive data across shared or public networks as if their computing devices were directly connected to the private network, and thus are benefiting from the functionality, security and management policies of the private network. Server Settings For Vpn (Virtual Private Network) Step1:First You have to access Your Router from gateway address. Step2: Then Goto Forwarding Menu .  Step3:Then Go to Virtual Server Server Port:1723 Give The Ip address of Server of vpn.Than Click Save.  Step4: Goto Reboot. Step5:Give The ip address of your network range.  Step6: Then Go to network and sharing center and than click onto change adapet setting and than press ALT+F Select New Incoming Connection. Step7:Than Configure the User Information. Step8:Then Tick On The Through Internet Connection. S